I got my eyebrows microbladed three years ago, sitting in a tiny studio above a nail salon, convinced I was about to solve my eyebrow problems forever. Spoiler: I wasn’t. Nobody sat me down beforehand and explained how this stuff actually fades, what makes it last longer or shorter, or why my friend’s brows looked fresh after two years while mine started fading at month ten.
So if you’re sitting there with fifteen browser tabs open trying to figure out whether this is worth the money and the needles, let me save you some of that research time.

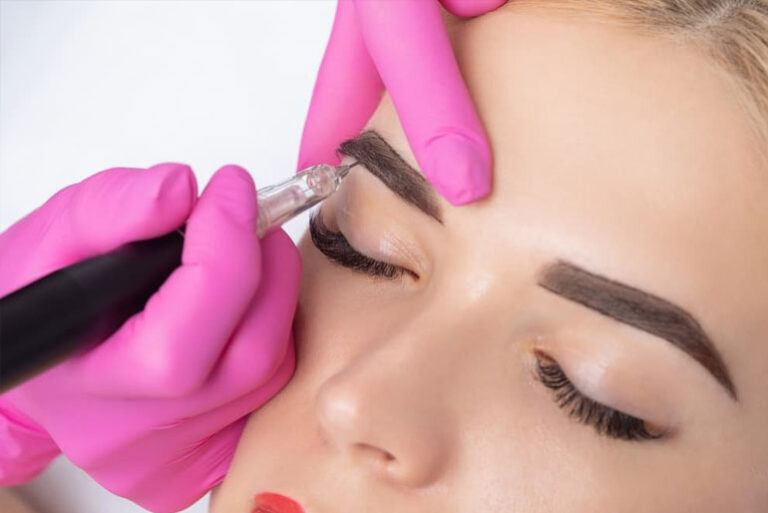
Wait, What Even Is Microblading?
Quick version, because you probably already know this part: it’s a semi-permanent tattooing technique where a technician uses a hand tool with tiny needles to draw individual hair-like strokes into your skin, depositing pigment as they go. It’s not the same as a regular tattoo — it sits more superficially in the skin, which is exactly why it fades instead of staying put forever.
That fading part is the whole point of this article.
So How Long Does It Actually Last?
The honest answer is somewhere between 1 and 3 years, but that range is doing a lot of heavy lifting. I’ve seen it last barely 8 months on someone with oily skin, and I’ve seen a friend’s brows still looking decent at the 3-year mark with almost no touch-up.
For me personally? My first set lasted about 14 months before I felt like it really needed a refresh. The color didn’t disappear completely — it just got patchy and turned a weird ashy gray-brown color in spots, which is honestly worse than it just fading evenly.
Why It Fades So Differently For Everyone
This is the part that surprised me the most after talking to my technician and doing my own digging.
Skin type matters more than anything else. Oily skin pushes pigment out faster because the oil interferes with how the pigment settles. If you’ve ever struggled with foundation sliding off your face by 2pm, that’s a hint your brows won’t hold onto pigment as long either. Dry and normal skin types tend to hold the color noticeably longer.
Sun exposure is a silent killer of pigment. I learned this the hard way after a beach trip about 6 months post-procedure where I barely wore sunscreen on my face. My brows faded visibly faster on the side that got more direct sun during that trip. UV rays break down pigment, same as they fade a tattoo.
How your body heals plays a role too. Some people’s immune systems treat the pigment as more of an “invader” and break it down faster. There’s no way to predict this beforehand, which is frustrating, but it’s just biology.
Aftercare in those first two weeks matters way more than people expect. I’ll get into this more below, but skipping steps here can literally cut your results in half.
The technician’s skill and machine depth setting affects this too. Pigment placed too shallow fades fast (sometimes within months). Pigment placed too deep can blur and turn blue-gray over time instead of fading cleanly. A good technician is using a precise hand tool, not a tattoo machine, and they should be confident explaining their pigment depth approach if you ask.
My Honest Timeline (Month By Month)
I think breaking this down by month actually helps more than vague statements, so here’s roughly what I experienced:
Weeks 1-2: Brows look way too dark and bold. This freaked me out at first — I texted my technician a panicked photo on day 3. This is completely normal; the color always looks more intense before it settles.
Weeks 3-4: Scabbing and flaking happens (lightly, not dramatically). Some color comes off with the flakes, which is normal and expected, not a sign of failure.
Month 2: This is when the “true” color shows up, usually lighter and softer than the initial bold look.
Months 3-12: This was my “good” stretch. Brows looked natural, filled-in, low maintenance. I stopped using brow pencil completely during this window, which honestly was the best part of the whole experience.
Months 12-14: Slow fading started. Not dramatic, but noticeable in photos and bright lighting.
Month 14+: Patchiness. Some strokes faded faster than others, leaving an uneven look that needed either a touch-up or going back to filling them in with a pencil.
Step-by-Step: How to Make It Last as Long as Possible
If you’re about to get this done, or just did it, here’s what actually helps based on what worked for me and what I wish I’d done differently.
1. Avoid water directly on your brows for the first 7-10 days. I know this sounds extreme, but showers, sweating, swimming — all of it can mess with healing pigment. I used a washcloth carefully around my brow area instead of letting water hit them directly.
2. Apply the aftercare ointment exactly as instructed, not more. My technician gave me a tiny tub of healing balm (similar to Vaseline-based aftercare balms many studios use) and said “less is more.” I made the mistake of overapplying it the first few days, thinking more product meant better healing. It actually suffocated the skin a bit and made my scabbing worse.
3. Do not pick at the scabs or flakes. I know, easier said than done. But picking pulls pigment out with it, leaving bald patches in your strokes. I picked at one tiny corner during week 2 out of pure boredom, and that exact spot faded first and fastest.
4. Wear SPF on your brows daily, even when it’s cloudy. I now use a mineral sunscreen stick I keep in my bag specifically for my face, and I genuinely think this is the single biggest factor in my second set lasting longer than my first.
5. Skip retinol and exfoliating acids near your brow area. I didn’t realize my nightly skincare routine (which included a retinol serum) was creeping onto my brow skin and accelerating fading until my technician pointed it out at my touch-up appointment.
6. Book your touch-up appointment at the 6-8 week mark, not later. This initial touch-up isn’t optional fluff — it’s part of the process. Skipping it (which I almost did because I was busy) means some strokes never fully take.
Real Mistakes People Make (Including Me)
Going in with unrealistic expectations was my first mistake. I thought this meant “no more eyebrow routine for years.” It’s more like “significantly reduced eyebrow routine for about a year, then gradual upkeep.”
Choosing a technician based on price alone is a common one I see in Facebook groups dedicated to this stuff. A $150 microblading deal is usually too good to be true — either the pigment quality is poor, or the technician is inexperienced, both of which affect longevity directly.
Not asking about pigment brand and depth before booking. Good technicians can name their pigment supplier and explain their technique without getting defensive. If someone gets vague or annoyed when you ask questions, that’s a red flag.
Going swimming or to a sauna too soon. I have a friend who hit the pool 4 days after her procedure for a vacation she couldn’t reschedule. Half her color washed out in patches, and she had to get a much more involved correction appointment.
Is It Worth Getting Touch-Ups, or Starting Over?
Once you hit that 1-2 year mark and things are fading unevenly, you’ve got two real options. A touch-up (sometimes called a “color boost”) refreshes existing strokes and is cheaper, usually 30-50% of the original price. Starting completely fresh means letting the old pigment fade out more first, which some technicians recommend if the original work wasn’t great.
I went with a touch-up at month 16 instead of starting over, and it extended my results another 18 months. Different technician this time, and honestly, the consultation alone taught me more than my first technician ever did.
Final Thoughts
If you’re going into this expecting permanent, flawless brows forever, you’ll be disappointed. If you’re going into it expecting a solid 1-2 years of low-maintenance, natural-looking brows with proper care, you’re in for a genuinely good experience.
The biggest lesson from my own three years with this: the procedure itself only gets you halfway there. What you do in those first two weeks, and how consistently you protect your skin from sun and harsh skincare products afterward, decides whether you’re looking at 10 months or 2.5 years before you need a refresh.
If you’re on the fence, talk to a few studios first, ask to see real healed results (not just day-of photos, which always look more dramatic), and ask specifically how long their typical client’s results last before fading. A technician who’s honest about the 1-3 year range, instead of promising you forever brows, is the one you want doing this.