I ruined three nail beds before I figured out what I’m about to tell you.
It was my cousin’s wedding, I had exactly one night to get my acrylics off before my own engagement shoot the next morning, and my acetone bottle was bone dry. The nearest open store was twenty minutes away and I was not about to drive there in curlers. So I did what every impatient person does — I started picking. Big mistake. Huge.
What came off wasn’t just the acrylic. Layers of my natural nail came with it. Thin, peeling, see-through nails that took almost four months to grow back to normal. That night taught me more about acrylic removal than any salon ever did, and since then I’ve tested basically every acetone-free method that exists, partly out of curiosity and partly because I now have a kid who somehow always needs my undivided attention right when I’m mid-removal.
So if you’re searching for ways to get acrylics off without acetone, you’re either out of acetone, sensitive to it, pregnant and avoiding the fumes, or just trying to be gentler on your nails. All valid reasons. Let’s get into what actually works.

Why People Avoid Acetone in the First Place
Acetone isn’t dangerous in small doses, but it’s harsh. It dries out your skin, makes your cuticles feel like sandpaper, and the smell alone can give some people a headache. I’ve got a friend who’s a hairstylist, and she can’t be around it for long because of how it irritates her sinuses.
Then there’s the pregnancy concern — a lot of moms-to-be just prefer to skip strong chemical fumes altogether, even though the actual risk from a quick nail soak is debated among doctors. Better safe than stressed, right?
And some of us just don’t have any on hand. That was literally my problem that wedding night.
What I Tried That Didn’t Work (So You Don’t Waste Your Time)
Before I get to the good stuff, let me save you some pain.
Hot water soaking alone — I sat with my hands in a bowl of hot water for almost forty minutes once. The acrylic softened a tiny bit at the edges, but nothing close to coming off. Total waste of a Sunday afternoon and my fingers looked like prunes.
Dental floss “popping” method — I saw this on a video where someone slides floss under the acrylic and pops it off. I tried it once. It worked on one nail. The other four, I basically pried up the nail bed with it. Not recommended unless your acrylics are already loose and lifting on their own.
Vinegar soak — Mild acid, mild results. It did nothing noticeable after twenty minutes.
Lesson learned: acrylic is tough stuff and it’s not going anywhere without either heat, mechanical filing, or a solvent of some kind. There’s no magic five-minute trick.
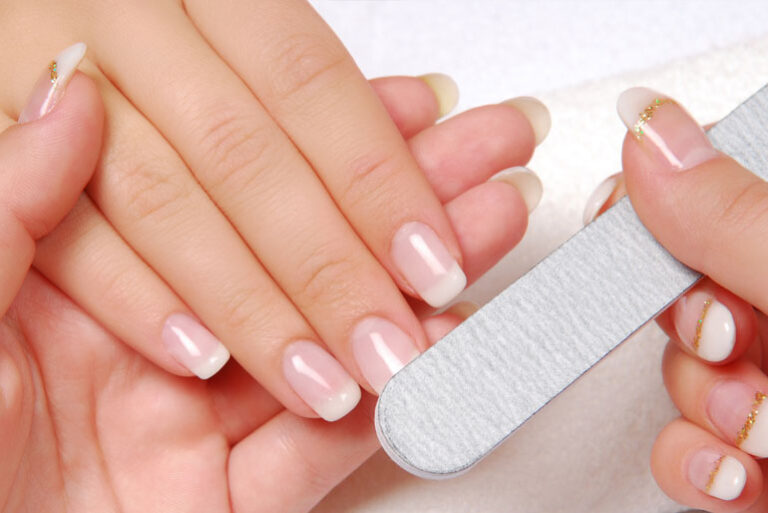
Method 1: The Warm Soapy Water + Filing Combo (My Go-To Now)
This is the method I use probably 80% of the time now, and it’s genuinely the safest for your actual nail.
What you need:
- A nail file (180-220 grit works fine, I use the cheap ones from the drugstore)
- A bowl of warm (not boiling) water
- A few drops of dish soap
- A cuticle pusher or orange stick
- Moisturizer for after
Steps:
- File down the top shiny layer of the acrylic gently. You’re not trying to remove it completely, just breaking the seal a bit so water can get underneath. Takes about five minutes per hand if you’re not rushing.
- Mix warm water with a squirt of dish soap in a bowl. Soak your fingertips for 15-20 minutes. I usually put on a show and just zone out during this part.
- After soaking, the acrylic edges should feel a little softer and lifted. Use the cuticle pusher to gently work it from the side, never forcing it. If it doesn’t budge, soak longer. Patience matters here more than anything.
- Once it starts lifting, you can usually peel it off in chunks rather than one solid piece. It comes off layer by layer, which honestly looks satisfying once you get the hang of it.
- Buff your natural nail lightly to smooth out any leftover residue, then moisturize like crazy. Your nails will be thirsty after this.
This method took me close to 45 minutes the first time. Now I can do it in about 25 because I know how much filing is “enough.”
Method 2: The Foil and Warm Towel Trick (No Soaking Required)
This one’s great if you don’t want to sit with your hands in a bowl the whole time, or if you’ve got kids running around and can’t be tied to one spot.
- File the top layer slightly, same as before.
- Soak a cotton ball in warm water (you can add a tiny bit of olive oil for extra softening).
- Place it on the nail, wrap with a small piece of foil to trap the heat.
- Wait 15-20 minutes. Repeat with fresh warm cotton if it cools down fast.
- Unwrap and gently push the acrylic off, edge first.
I use this one most when I’m also cooking dinner or doing something else. You can walk around with foil-wrapped fingers way easier than you can carry a bowl of water.
Method 3: Visiting a Salon for Removal Only
I know this sounds obvious, but a lot of people don’t realize salons will do removal-only services even if you didn’t get your nails done there. I’ve done this twice when I just didn’t want to deal with the mess at home.
Most salons use an e-file (electric nail drill) to grind down the acrylic safely without acetone, layer by layer, until they’re close to your natural nail. A trained tech knows exactly how much pressure to use and when to stop. This is honestly the safest non-acetone method if you can spare $10-15 and twenty minutes.
The catch — and I learned this the hard way — is that not every tech is gentle. I went to one place where the woman was clearly rushing, and the drill got a little too close to my actual nail bed on one finger. It was sore for two days. So if you go this route, watch for redness or heat building up, and don’t hesitate to ask them to slow down or use a finer grit bit.
Common Mistakes People Make
Picking or prying without softening first. This is the one that wrecked my nails that wedding night. If the acrylic isn’t lifting easily, it’s not ready yet. Don’t force it.
Filing too aggressively. You only need to break the top seal, not grind the whole thing down by hand. I’ve seen people file straight through to their natural nail, which thins it out badly.
Skipping the moisturizer step. Your nails and cuticles take a beating during removal even without acetone, especially from filing. I keep cuticle oil right next to my filing kit now so I don’t forget.
Rushing the soak time. Fifteen minutes feels long when you’re bored, but cutting it short just means more force needed later, which is exactly what damages your nails.
Using boiling water. Someone once told me hotter water works faster. It doesn’t — it just burns your fingertips. Warm and comfortable is the goal, not scalding.
A Few Honest Observations
Acetone-free removal takes longer than soaking in actual acetone, there’s no way around that. If you’re in a genuine rush, acetone is still the faster option. But if you’ve got a free evening, a movie queued up, and patience, these methods work just as well without the harsh smell or dry skin afterward.
I’ve also noticed my nails recover faster after non-acetone removal. Less brittleness, less peeling in the days after. Could be a coincidence, but three separate friends have said the same thing to me unprompted, so maybe there’s something to it.
One more thing — if your acrylics were applied with a stronger, more durable formula (some salons use tougher gel-acrylic hybrids now), expect these methods to take a bit longer. Not all acrylics are created equal, and the cheaper or older sets tend to come off easier.
Final Thoughts
Honestly, the biggest thing I wish someone had told me before that wedding night is that there’s no shortcut that skips both time and effort. Either you give it the soak time it needs, or you go somewhere that has the right tools to do it quickly. Trying to force it open with your own two hands and zero patience is how you end up with nails that look like they went through a shredder.
Whichever method you pick, just go slow, keep your nails moisturized after, and give them a few days to breathe before your next set. They’ve earned it.